Transform your mouse productivity with X-Mouse Button Control! Easily customize and remap mouse buttons for enhanced workflow, gaming precision, and superior productivity. Download free to unlock effortless multitasking, automate repetitive tasks, and boost your efficiency instantly!
What is X-Mouse Button Control?
X-Mouse Button Control (XMBC) is a powerful, free Windows application that allows users to customize and remap their mouse buttons for enhanced productivity and efficiency. Developed by Highresolution Enterprises, this lightweight yet feature-rich software provides extensive control over how mouse buttons function, making it particularly useful for gamers, power users, and professionals who rely on advanced input configurations.
X-Mouse Button Control is a Windows application for remapping your mouse buttons. It is not a driver
for pointing devices, but rather works in conjunction with the installed drivers. XMBC supports
binding mouse buttons for an individual process and also allows you to bind to specific window
elements. XMBC is not only for button mapping, various navigation customizations are available;
tuning the pointer and scroll wheel to your needs.
X-Mouse Button Control (XMBC) allows you to create application and window specific profiles. This in turn, allows you to re-configure your mouse behaviour for individual applications or windows. For each profile you can also configure up to 10 ‘layers’ of different button configurations which you can switch between using hot-keys or mouse buttons.
X-Mouse Button Control stands out due to its high customizability, ease of use, and versatility. Unlike built-in Windows mouse settings, XMBC offers granular control over button functions with per-application profiles, making it an essential tool for users looking to maximize their mouse’s potential. Additionally, its free and actively maintained nature ensures that it remains compatible with modern Windows versions and software.
Key Features
- Custom Button Mapping:
X-Mouse Button Control allows you to fully customize and reassign any mouse button to execute specific tasks. With its intuitive interface, you can set buttons to open applications, trigger keyboard shortcuts, control media playback, or even launch system commands. This extensive flexibility ensures your mouse adapts perfectly to your personal or professional workflow. - Profile-Based Configuration:
Effortlessly manage multiple custom configurations tailored to individual applications with the profile-based setup feature. This enables your mouse to automatically switch behavior according to the active software, enhancing productivity and user experience. Profiles can be activated automatically or manually, providing seamless adaptability. - Advanced Layer System:
Maximize your mouse functionality by utilizing X-Mouse Button Control’s advanced layer system. Define multiple layers within each profile, easily switching between them using hotkeys or button combinations. This allows quick transitions between different button configurations, perfect for multitasking or specialized workflows like gaming, design, or programming. - Gesture and Scroll Customization:
Take control of your mouse navigation with comprehensive gesture and scroll customization. Modify scrolling speed, direction, and behavior to fit your browsing preferences. Assign custom actions to intuitive mouse gestures, enabling rapid execution of commands and significantly improving navigation efficiency. - Robust Macro Support:
Simplify repetitive tasks and boost productivity with powerful macro capabilities. X-Mouse Button Control supports detailed macros that automate sequences of keystrokes, mouse clicks, and other complex actions. Create macros easily with the user-friendly macro editor, perfect for tasks like form filling, gaming combos, or repetitive software operations. - Integrated Clipboard Management:
Streamline your workflow by assigning mouse buttons to essential clipboard functions. Easily copy, paste, and manage clipboard content directly through your mouse buttons, reducing reliance on keyboard shortcuts and accelerating everyday tasks such as document editing, coding, or data entry. - Portable and Lightweight Design:
X-Mouse Button Control is designed to be exceptionally lightweight and portable, consuming minimal system resources. It does not require traditional installation, allowing you to run it directly from a USB drive or any external storage device. Ideal for users who switch between multiple computers, it ensures consistency in mouse configuration without impacting system performance.
Getting Started
Step 1: Download and Set Up X-Mouse Button Control
- Downloading XMBC:
- Navigate to the ‘Downloads’ section.
- Select the latest stable release suitable for your Windows version.
- Installation and Portability:
- XMBC is portable, meaning it doesn’t require formal installation.
- Extract the downloaded ZIP file to a desired location (such as a USB drive or a preferred folder on your PC).
- Run the executable file (
XMouseButtonControl.exe) to launch the application.
Step 2: Familiarize Yourself with the Interface
Once XMBC is running, you’ll see a clean and intuitive user interface featuring three main tabs:
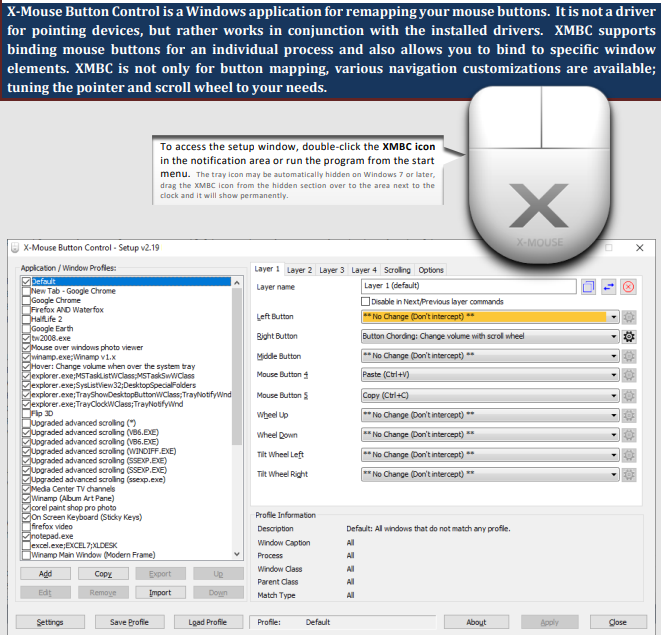
- Layer & Button Assignment: Set mouse button actions and layer-specific configurations.
- Scrolling & Navigation: Adjust scrolling behaviors and mouse gestures.
- Settings: Fine-tune the software, manage general preferences, and view system integration options.
Step 3: Configuring Custom Mouse Buttons
- Assigning Actions:
- In the main window, click on the desired mouse button (e.g., Button 4, Button 5, Middle Button).
- From the dropdown menu, choose your preferred action (launch application, execute keyboard shortcuts, control media playback, etc.).
- Click “Apply” to save your settings.
- Assigning Application-Specific Buttons:
- Click “Add” under the Application/Window Profiles section.
- Select your desired application executable from the displayed list or browse your system to locate it manually.
- Once added, configure mouse buttons specific to that application, and click “Apply.”
Step 4: Using the Profile-Based Configuration
By default, profiles are automatically activated as the mouse moves over the defined application, window or region.
This has many uses, for example:
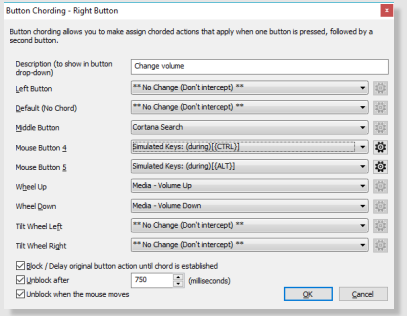
- Changing the behaviour of the mouse over certain windows, such as making the mouse wheel change volume when hovering over the system tray or you-tube video.
- In games/programs which do not natively support the extended, 4th and 5th mouse buttons, you can map keys to each button.
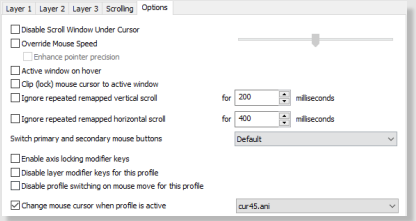
Profiles enable your mouse settings to adapt based on the application currently in use:
- Click on “Add” to create a new profile.
- Choose the specific application you want this profile to target.
- Customize mouse button settings specifically for that profile.
- XMBC automatically switches to this profile when the associated application becomes active.
Step 5: Utilizing the Advanced Layer System
Layers allow multiple button configurations within a single profile:
- By default, each profile has multiple layers (typically 5).
- Customize each layer independently with unique button actions.
- Quickly switch between layers by setting specific hotkeys or dedicated mouse button combinations:
- Go to the “Settings” tab, select “Hotkeys,” and define your preferred shortcuts for layer switching.
Step 6: Gesture and Scroll Customization
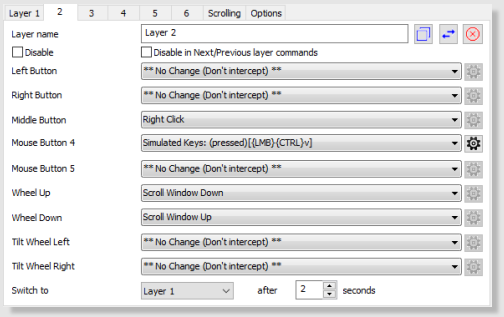
XMBC allows you to change the behaviour of the mouse buttons and scroll/tilt wheel. The extensive list of functions available to map to your mouse buttons includes options such as:
- Send any keys using the ‘simulated keystrokes’ editor
- Button Cording (shifting/combining) buttons perform different actions
- Timed button actions, that change depending how long you hold a button down for
- Launch any windows application
- Clipboard control (Copy/Cut/Paste)
- Media control (Play/Pause/Stop/Volume/Mute etc.)
- Capture screen (or active window) image to clipboard
- Click-Drag [Sticky buttons/keys]
- Various support for specific Windows operating systems features, such as Flip3D in Vista, ModernUI/Metro in Windows 8 and Virtual Desktops in Windows 10/11!
- And much, much more!
Customize your mouse scrolling and gestures for smoother, intuitive navigation:
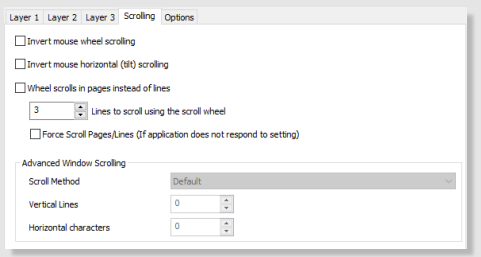
- Navigate to the “Scrolling & Navigation” tab.
- Adjust scrolling behavior (scroll direction, acceleration, speed).
- Define custom mouse gestures by assigning actions (for example, swipe gestures or circle gestures).
- Click “Apply” to save preferences.
Step 7: Creating and Using Macros
Automate complex or repetitive tasks efficiently:
- Select the button you want to assign a macro to and choose “Simulated Keys” from the dropdown menu.
- Click the gear icon next to the action dropdown to open the macro editor.
- Input the keystroke sequences or mouse actions you wish to automate.
- Save the macro, ensuring it’s properly assigned to your selected button.
Step 8: Leveraging Clipboard Management
Simplify clipboard interactions by mapping mouse buttons to copy-paste functions:
- Choose a mouse button to assign clipboard operations.
- From the action dropdown menu, select clipboard-related commands such as “Copy,” “Paste,” or “Cut.”
- Apply changes to activate quick clipboard access.
Step 9: Exporting and Importing Settings
If you regularly switch machines, XMBC makes it easy to transfer your configurations:
- Under the “Settings” tab, click “Export” to save your configurations.
- Save the configuration file (.xmbcs) onto your USB drive or cloud storage.
- To import on another machine, open XMBC and click “Import” to load your previously saved settings.
Step 10: Managing and Updating XMBC
Ensure optimal performance and compatibility:
- Regularly check for updates.
- Backup configurations periodically, especially before updating.
- Take advantage of XMBC’s built-in backup feature under the “Settings” menu.